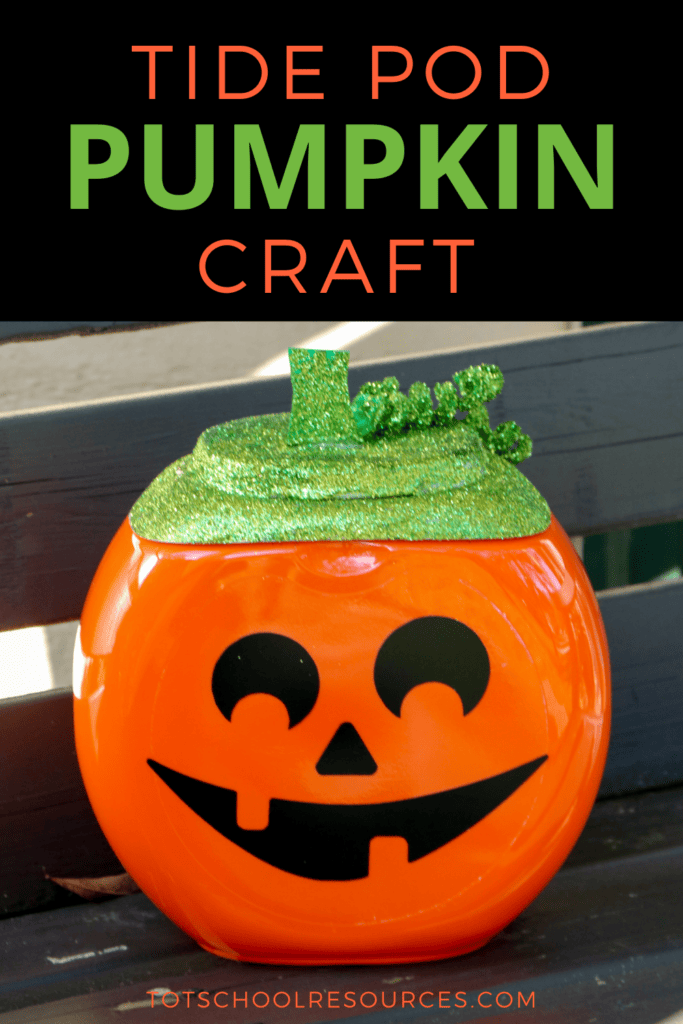
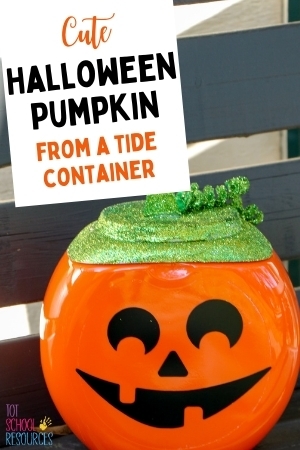
Easy Tide Pod Pumpkin {with face template}
Pumpkins are a must have at Halloween. Upcycle an old tide pod container into a spooky jack-o-lantern in this easy Halloween activity. I’ve even included a face template or you can create your own.
Kids are gonna love helping to create this fun pumpkin. When you’re done simply place a tea light inside to light up your creation.
This post contains affiliate links. If you make a purchase after clicking one of my links I may earn a commission at no additional cost to you.
Don’t just toss those old tide pod containers…upcycle them into a fun Halloween craft! This is an easy craft even young kids can help make and everyone will love enjoying them all spooky season long.
The other bonus to these pumpkins is they won’t rot like a real one!
Think this is cute but don’t use tide pods? Ask family & friends or try joining Nextdoor or your local Buy Nothing Group on facebook. You’ll probably find someone that has a container they’re willing to part with.
As chemical residue can be left behind I do not recommend putting anything other than a tea light inside your pumpkin. Keep a lid on top to prevent kids from playing with the inside of the container.
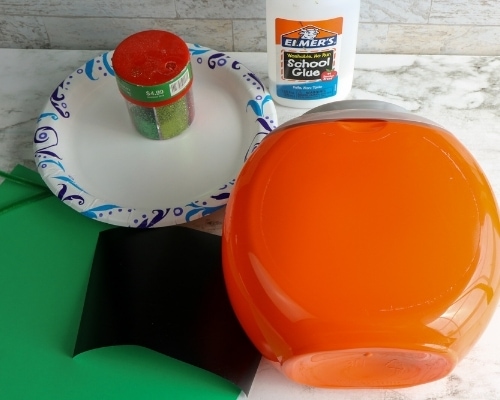
Tide Pod pumpkin supplies
- Empty tide pod container
- Liquid glue
- Green construction paper or cardstock
- Green glitter
- 2 green pipe cleaners
- printable face template
- Scissor or cricut
- Goo Gone
- Sponge brush or paint brush
- One of the following
- Printer paper
- 8.5×11 full sheet label
- Black adhesive vinyl
- Sticker Pumpkin Faces
How to make a tide pod pumpkin
1 – The first step is the hardest…removing the label!
Start by soaking the container in hot water. Then scrape off what you can. Lastly use Goo Gone to remove what’s left of the label. You can also try a heat gun if you have one.
2 – Remove the top from the container and set the container aside.
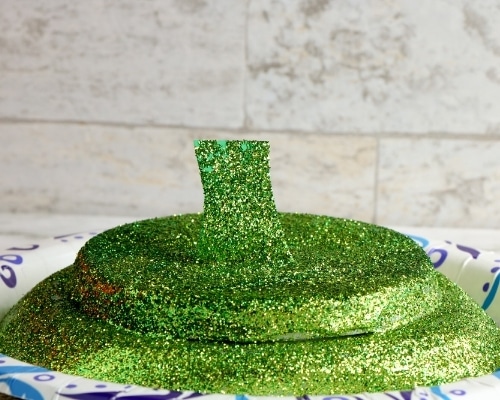
3 – Take your green paper or cardstock and cut out a stem. (Leave it a little long on the bottom so you can fold a piece to create a tab to attach to the lid.)
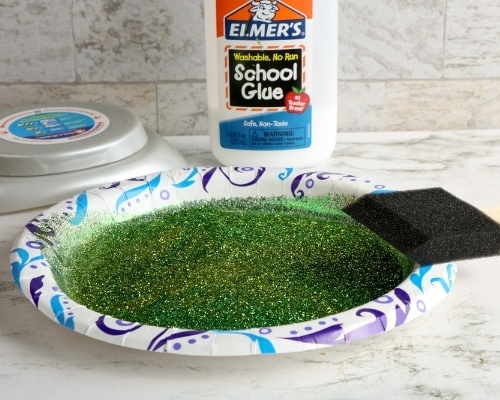
4 – Coat the lid with a thin layer of liquid glue using a sponge brush or paint brush.
Then sprinkle the top with green glitter until covered and set aside to dry.
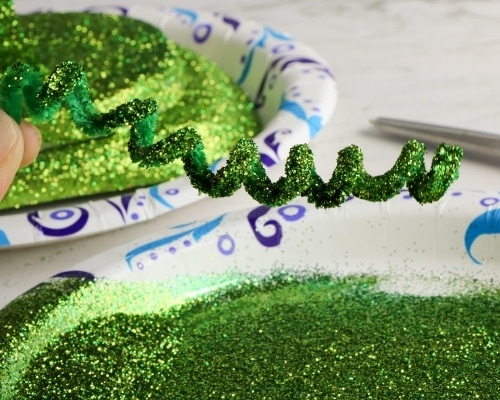
5 – Curl the pipe cleaners to create a vine. (You can wrap them around a pen or pencil to help make the curl).
Roll the pipe cleaner in glue and then roll it in the green glitter. Set aside to dry.
6 – Put a thin layer of glue on the paper stem and sprinkle with green glitter. Set aside to dry.
HATE GLITTER? You can use the stem and pipe cleaner vines without coating them in glitter and you can leave the lid orange or try painting it green.
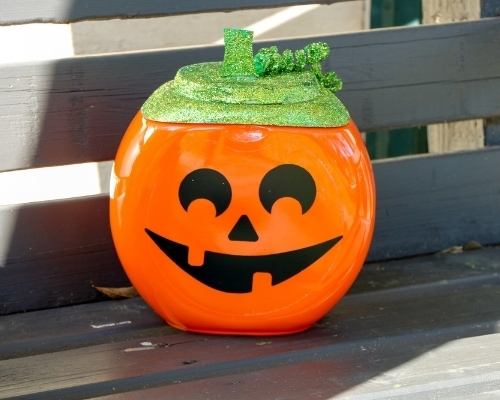
7 – Now it’s time for the face. If you want to create your own face design you can cut it out of black paper and glue it on or cut it out of a black label and simply stick it on.
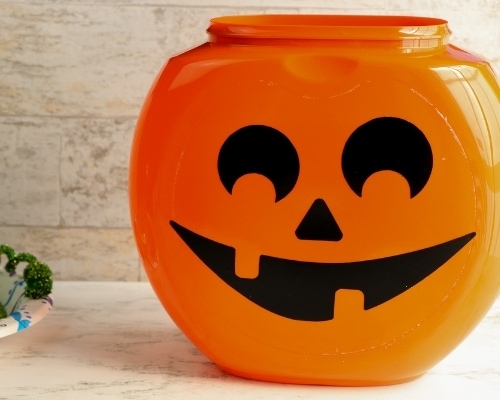
If you like the face on ours you can print it on paper or a full sheet label and cut it out. If you print in on label paper you’ll end up with stickers you can easily put on your pumpkin. Or cut it out with a machine like a Cricut on black adhesive vinyl.
Another option is to grab a set of these sticker faces and simply slap your favorite face on your pumpkin.
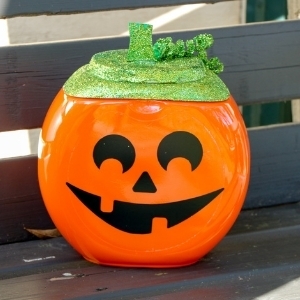
8 – Check that your glitter pieces are all dry. Then attach the stem and vines to the lid of the container.
9 – Place a tealight inside and you’re ready to display your re-useable pumpkin!
Printable pumpkin face
As I mentioned above you can print this PDF on paper, cut it out and glue it on or cut it out with a Cricut or similar.
Printables are for personal use only. All printables on Tot School Resources website are the property of totschoolresources.com and may not be sold, used for commercial purposes, or given away for free on your own website.
I hope you enjoy this craft! Tag your creations on Instagram @totschoolresources and check out our Halloween Page for more fun crafts & activities.
Tide Pod Pumpkin
Cute pumpkin made from a tide pod container.
Materials
- Empty tide pod container
- Green construction paper or cardstock
- Green glitter
- 2 green pipe cleaners
- printable face template
- One of the following
One of the following for the face
- Printer Paper
- 8.5x11 black label
- Black Adhesive vinyl
Tools
- Liquid glue
- Scissors or Cricut machine
- Goo Gone
- Sponge brush or paint brush
Instructions
- Before you can create your pumpkin you'll need to remove the label from the container. Start by soaking the container in hot water. Then scrape off what you can. Lastly use Goo Gone to remove what's left of the label. You can also try a heat gun if you have one.
- Remove the top from the container and set the container aside.
- Cut a stem out of green paper or cardstock. (Leave it a little long on the bottom so you can fold a piece to create a tab to attach to the lid.)
- Coat the lid with a thin layer of liquid glue using a sponge brush or paintbrush. Then sprinkle with green glitter until covered and set aside to dry.
- Curl the pipe cleaners to create a vine. (You can wrap them around a pen or pencil to help make the curl).
- Roll the pipe cleaner in glue and then roll it in the green glitter. Set aside to dry.
- Put a thin layer of glue on the paper stem and sprinkle with green glitter. Set aside to dry.
- If you want to create your own face design you can cut it out of black paper and glue it on or cut it out of a black label and simply stick it on. If you like the face on ours you can print it on paper or a black label and cut it out. Or cut it out with a machine like a Cricut on black adhesive vinyl.
- Check that your glitter pieces are all dry. Then attach the stem and vines to the lid of the container.
- Place a tealight inside at night for a spooky glow!

I used a heat gun and the label came right off. Just have to be careful not to have the heat gun on it very long