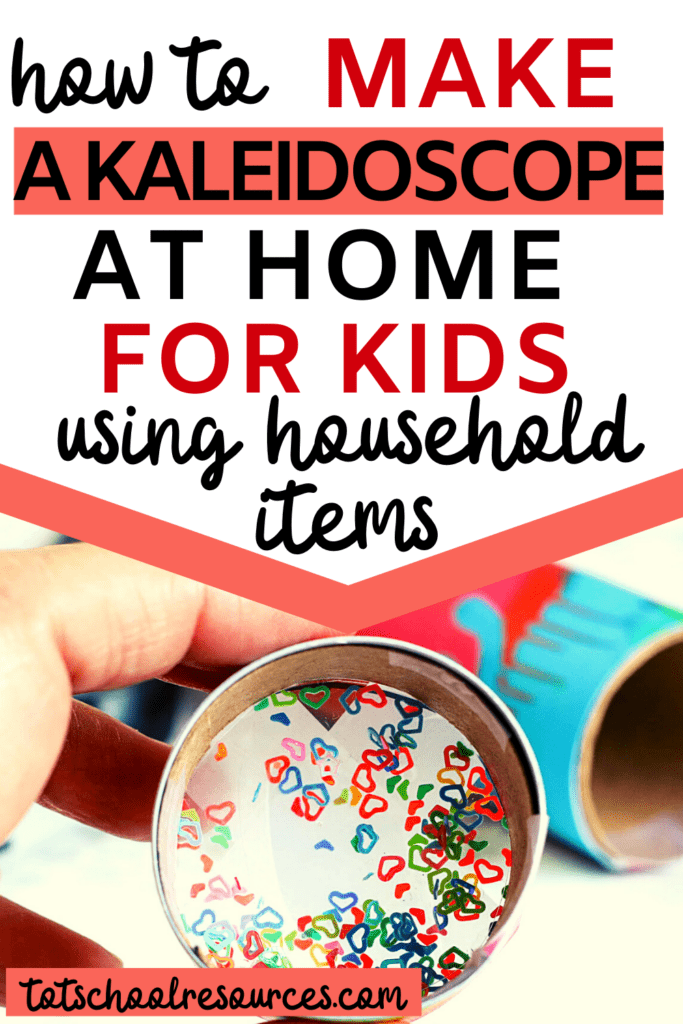
Easy Homemade Kaleidoscope for kids {tutorial with pictures}
Making a homemade kaleidoscope for kids sounds like a really big project, but it’s actually a rather easy build with a little adult assistance. Plus it makes a really great STEM activity whether you make it at home or in a classroom.
I made this really easy step-by-step tutorial with pictures for you to follow that will help you learn how to make a homemade kaleidoscope with your kids.
This post contains affiliate links. If you make a purchase after clicking one of my links I may earn a commission at no additional cost to you.
Kaleidoscope is Greek for “beautiful form to see.”
While the name is Greek, they weren’t invented in Greece! Instead, it was invented in Scotland by David Brewster.
You can learn more about kaleidoscopes at How Stuff Works.
This activity can be a great way to get your child who is an artist to be interested in science. The combination of the magical patterns of the kaleidoscope and learning the science behind what makes it happen is a great way to spark an interest in science.
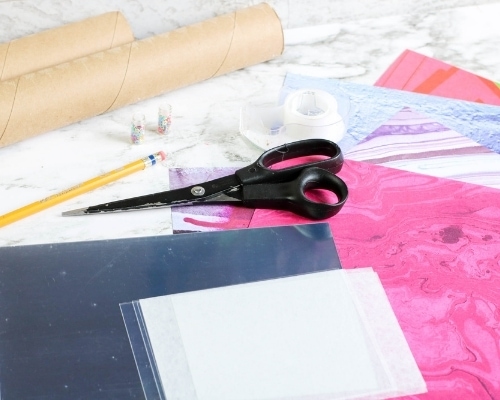
Materials for a DIY kaleidoscope
This fun project comes together with a few household items, a mirror sheet, and some beads, sequins or any colored pieces that light can pass through. The key is that they are translucent.
- 1 long cardboard tube, a used paper towel tube should work perfectly
- 1 plastic sheet or clear plastic from a fruit container can be used as well
- 1 flexible mirror sheet or another type of reflective paper
- Permanent marker or pen
- Clear tape
- Scissors
- Assorted small beads, buttons, or sequins
- Optional: 1 12×12 inch sheet of decorative paper
Step-by-step directions for DIY kaleidoscope
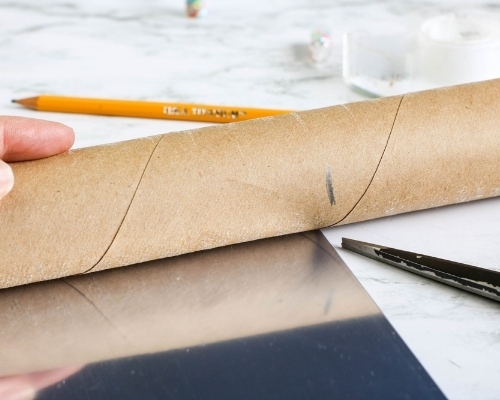
Step 1: Cut the Cardboard
Cut the cardboard tube to match the length of the flexible mirror sheet. To do this line the mirror sheet up with one end of the cardboard tube and mark a line on the tube at the other end of the sheet.
This will be the main tube for the kaleidoscope.
Step 2: Cut the Mirror Sheet, Mark and Fold It
Cut the flexible mirror sheet 3 inches wide.
On the flexible mirror sheet, measure and mark 1-inch increments across the width to know where the two folds will be.

Fold the sheet into a long triangular tube.
Tape the sides together where they meet to form the tube.
Slide the triangular tube into the cardboard tube and secure it with tape.
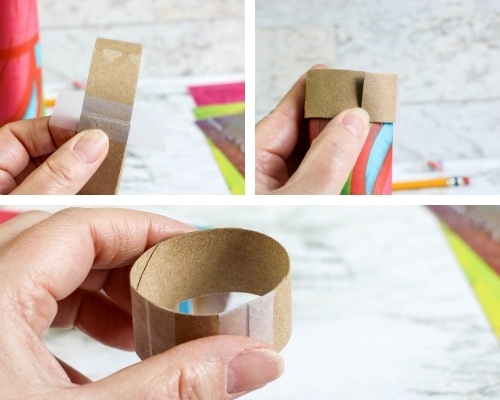
Step 3: Create the Outer Ring of the Kaleidoscope
From the remaining piece of the tube, you will create the outer ring of the kaleidoscope.
Mark off 2 1″ sections and cut them off the tube.
Snip each circle to create a strip instead of a circle.
Place the two strips together to fit loosely around the outside of the main cardboard tube and join together with tape.
Step 4: Cut Two Circles from the Plastic Sheet
Using the newly formed ring, trace two circles on the plastic sheet.
Cut out the circle with scissors.
Attach one circle to the small ring using clear tape.
Trim the remaining circle to be just slightly smaller than the ring so it will fit inside, you’ll want it to fit snuggly.

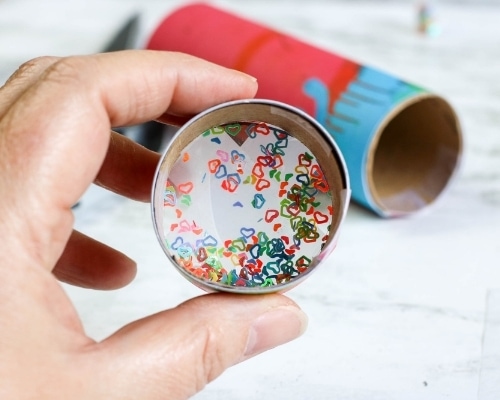
Step 5: Place the Beads or Sequins
Place a layer of beads or sequins in the bottom of the ring.
Slide the remaining clear circle over the layer of beads.
Step 6: Decorate the Kaleidoscope
Cover the cardboard tube and outer ring with decorative paper using tape to attach.
Kids can also simply color the outside, paint it, or cover it with stickers. Just don’t squish the cylinders.
Step 7: Put the Adjuster Ring On
Slide the longer tube inside the small ring.

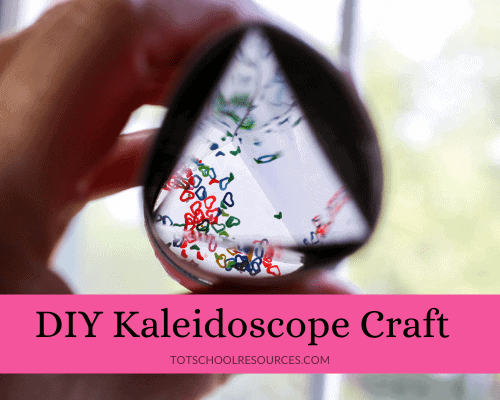
Step 8: Use the Kaleidoscope
With the clear window facing a window or light, look through the tube and gently turn the small outer ring.

Can you substitute tinfoil for reflective paper?
Simple answer no. Unfortunately, aluminum foil is not a substitute for reflective paper.
We thought that if you wrapped tinfoil around card stock it could replace the reflective paper. It wasn’t reflective enough and we did not get the effect of the kaleidoscope.
That doesn’t mean that you shouldn’t let your kids try it.
It is a great thing to try and let kids figure out why it doesn’t work. Failed experiments are even more valuable than successful ones. You could even try other materials that are reflective including shiny silver cardstock, or mirror paint on cardstock.
How making an easy homemade kaleidoscope can be a great STEM project
Going through the process of making this easy homemade kaleidoscope is a great STEM project.
If you are unfamiliar with the term STEM it means Science, Technology, Engineering, and Math.
STEM projects need to be hands-on to work with the concepts in a concrete way. Making this kaleidoscope project is definitely a great way to work with the idea of reflection in a concrete way.
What can you use as reflective paper?
One way to allow kids to experiment and work on their engineering skills is to let them decide which reflective material they should use.
Will aluminum foil work? What about foil attached to cardstock? What other ideas can they come up with?
They can test it by creating all the parts of the kaleidoscope but without taping the triangle piece into the tube. That way that piece can be switched out to experiment with different materials.
What makes the prettiest view?
The other easy area to experiment with is what goes in the viewing area.
Try placing different items in the small circle and see which works best.
They can also experiment with looking at different things. Look through it pointed at a bright window, holding a flashlight up to the end, in a dark room.
You could even find some small glow-in-the-dark bits to put in there and see how that looks in a darkened room! You might try using something like these glow-in-the-dark nail decals.
Making a DIY Kaleidoscope can be a great activity to do at school or even at home. It is a great opportunity to work with mirrors and reflection. It might even be a good way to get your artistic kiddo interested in science.
Follow us on Pinterest for more great crafts & activities for kids.